Fully automated deployments with GitHub Action workflows
/ 7 min read
Table of Contents
Prerequisites
- The repository must be stored on GitHub to make use of GitHub Action workflows
- Some of the steps in the workflow are specific to my site/project, e.g., the node version, the package manager (pnpm), …
The process is actually nearly identical to what is documented in this previous post. Instead of the magic happening on your laptop/pc, it happens on a GitHub runner. To protect your private key or other sensitive information from being leaked accidentally, you need to store them manually as secrets on GitHub.
Creating the workflow file - step by step
⬇️ Scroll to the full content of the workflow at the end of this post.
- Create
.github/workflows/deploy.ymlin your projectname: 'Deploy artefact' - Add two triggers to the workflow: manual and on each change on your
mainbranch:name: 'Deploy artefact'on:workflow_dispatch:push:branches: [ main ] - Add a job and name it, e.g.
deploy. This job runs on Ubuntu and consists of several steps.name: 'Deploy artefact'on:workflow_dispatch:push:branches: [ main ]jobs:deploy:runs-on: ubuntu-lateststeps: - Add a step to check out the repository code into your runner. It needs access to the source code, so it can build the artefact and deploy it.
jobs:deploy:runs-on: ubuntu-lateststeps:- name: 'Check out repository'uses: actions/checkout@v4
- Add a step to install node, so the runner can execute JavaScript tooling
- name: 'Install node'uses: actions/setup-node@v4with:node-version: 18registry-url: 'https://npm.pkg.github.com'
- Add a step to install pnpm. The runner uses it to run the package manager, e.g. to install dependencies.
- name: 'Install pnpm'uses: pnpm/action-setup@v4with:version: 8.6.1run_install: false
- Add steps to install all dependencies and then build via shell command
- name: 'Install dependencies'run: pnpm install- name: 'Build artefact'run: pnpm build
- Add a step to read secrets and variables and then execute deployment via rsync
- name: 'Prepare secrets for ssh connection and execute deployment'env:DEPLOY_KEY: ${{ secrets.DEPLOY_KEY }}SSH_PASS: ${{ secrets.SSH_PASS }}USER: ${{ vars.REMOTE_USER }}HOST: ${{ vars.REMOTE_HOST }}DIR: ${{ vars.REMOTE_DIR }}run: |mkdir -p ~/.sshecho "$DEPLOY_KEY" > ~/.ssh/id_ed25519chmod 600 ~/.ssh/id_ed25519ssh-keyscan -t ed25519, "$HOST" >> ~/.ssh/known_hostseval "$(ssh-agent -s)"echo "$SSH_PASS" | ssh-add ~/.ssh/id_ed25519rsync -avzr -e 'ssh -o StrictHostKeyChecking=no -v' --delete ./dist/ "${USER}"@"${HOST}":/var/www/html/"${DIR}"
Analysing ssh connection setup and deployment
This last step is the most complex one, so let’s break down what’s going on. Assign the values of the repository variables/secrets to the variables in your workflow:
env: DEPLOY_KEY: ${{ secrets.DEPLOY_KEY }} SSH_PASS: ${{ secrets.SSH_PASS }} USER: ${{ vars.REMOTE_USER }} HOST: ${{ vars.REMOTE_HOST }} DIR: ${{ vars.REMOTE_DIR }}Next, store the ssh keys on the runner (which is also an Ubuntu machine).
Therefore, use terminal commands to create a folder .ssh and then write the private ssh key in a file, e.g. named id_ed25519.
Make sure, only the owner (the user executing these commands) may read/write the file.
mkdir -p ~/.sshecho "$DEPLOY_KEY" > ~/.ssh/id_ed25519chmod 600 ~/.ssh/id_ed25519Add the ssh key to the known_hosts file to verify the host’s ($HOST) identity:
ssh-keyscan -t ed25519, "$HOST" >> ~/.ssh/known_hostsBefore an ssh connection can be opened, the ssh agent needs to be started. Then, add the private key together with its corresponding passphrase to the ssh agent:
eval "$(ssh-agent -s)"echo "$SSH_PASS" | ssh-add ~/.ssh/id_ed25519Finally, use rsync to deploy the artefact to the configured destination.
rsync -avzrtransfers files recursively but also compresses them-e 'ssh -o StrictHostKeyChecking=no -v'is important to force the ssh agent to accept new hosts without prompt!--deleteto delete old files./dist/is the source directory, containing the artefact"${USER}"@"${HOST}":/var/www/html/"${DIR}"is the destination of the deployment - the full path to the directory on your vps, which hosts the artefact
rsync -avzr -e 'ssh -o StrictHostKeyChecking=no -v' --delete ./dist/ "${USER}"@"${HOST}":/var/www/html/"${DIR}"Unfortunately, the preparation of the ssh connection and the actual deployment cannot be split up into two separate steps. Each GitHub Actions step runs in its own (non-interactive) shell process, so environment variables and the ssh agent won’t be available any more in a later step.
Adding the variables and secrets to GitHub
Merging the workflow above into your main branch will automatically trigger a run on each change. You may also manually trigger the workflow on any branch of your choice that contains the workflow file. However, you must add the values to each variable/secret, otherwise the run will fail.
Store two secrets and three variables in GitHub:
DEPLOY_KEY: the private ssh key necessary to access the vps via sshSSH_PASS: the corresponding passphrase for the private keyUSER: name of the user the private ssh key belongs toHOST: ip address of the vpsDIR: name of the directory on the vps that contains the artefact
You may add environment or repository variables. With the workflow file set up as described above, you’ll need to add your key value pairs as repository variables/secrets.
Screenshots on how to add secrets/variables in GitHub
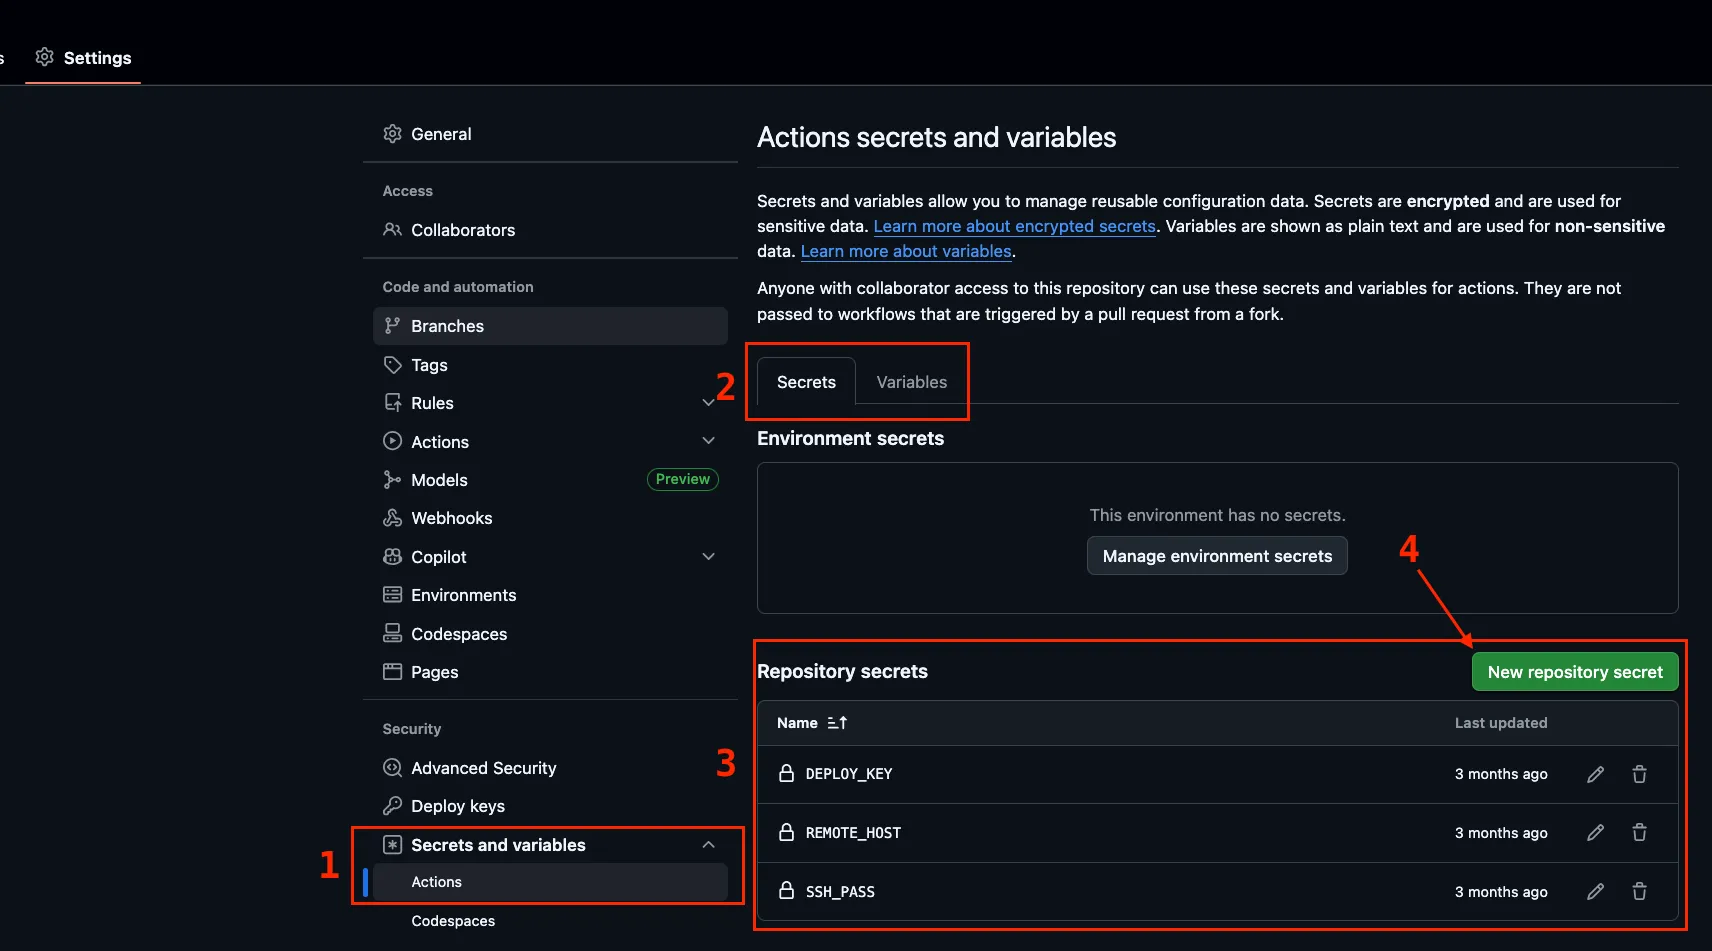 ➡️ Navigate to https://github.com/{YOUR_USERNAME}/{YOUR_REPOSITORY_NAME}/settings/secrets/actions to add secrets
 ➡️ Navigate to https://github.com/{YOUR_USERNAME}/{YOUR_REPOSITORY_NAME}/settings/variables/actions to add variables
If you decide to use environment variables, define the environment in your workflow file:
jobs: deploy: runs-on: ubuntu-latest environment: PROD steps:The destination of your deployment is the actual directory that contains the static site (the artefact).
In the following snippet, I connected to my vps via ssh, navigated into /var/www/html/metters.dev, and then listed the contents:
metters@ubuntu-vps:/var/www/html/metters.dev$ lltotal 244drwxr-xr-x 11 metters root 4096 Sep 7 14:08 ./drwxr-xr-x 9 metters root 4096 Aug 10 13:01 ../drwxr-xr-x 2 metters root 4096 Sep 7 14:08 _astro/-rw-r--r-- 1 metters root 31209 Sep 7 14:08 index.htmldrwxr-xr-x 43 metters root 4096 Sep 7 14:08 posts/...Troubleshooting
Why can I not find my newly created workflow to manually trigger it?
An ‘instance’ of the workflow must first exist on the main branch of your repository.
After you have merged your workflow into your main branch, it will show up in Actions
But I don’t want to test my workflow on
main
- Add a ‘dummy’ workflow on your
mainbranch. For a minimal run:- Add a manual trigger
- Add a single step, e.g. let it print out “Hello, world!” via
echo
- Create a feature branch from
main - Develop and test your workflow on that feature branch. You might want to update the destination of the deployment, to avoid deploying an artefact that’s under development on PROD.
The step to install the dependencies or build the artefact fails
- Read the error logs of the failed run
- Are you using the correct package manager?
- Is its version correct?
- …
The deployment step fails
- Check whether you have properly stored your repository variables and secrets
- Check whether the user that technically executes the deployment (the owner of the private key) exists on your vps.
- Check whether that user has ownership of the directories on your vps
- Check the name of the folder containing the build artefact and update the name in your deployment step accordingly. Common names are
dist,build,target, … - Read the error logs of the failed run
Full workflow ‘Deploy artefact’
name: 'Deploy artefact'on: workflow_dispatch: push: branches: [ main ]jobs: deploy: runs-on: ubuntu-latest steps: - name: 'Check out repository' uses: actions/checkout@v4 - name: 'Install node' uses: actions/setup-node@v4 with: node-version: 18 registry-url: 'https://npm.pkg.github.com' - name: 'Install pnpm' uses: pnpm/action-setup@v4 with: version: 8.6.1 run_install: false - name: 'Install dependencies' run: pnpm install - name: 'Build artefact' run: pnpm build - name: 'Prepare secrets for ssh connection and execute deployment' env: DEPLOY_KEY: ${{ secrets.DEPLOY_KEY }} SSH_PASS: ${{ secrets.SSH_PASS }} USER: ${{ vars.REMOTE_USER }} HOST: ${{ secrets.REMOTE_HOST }} DIR: ${{ vars.REMOTE_DIR }} run: | mkdir -p ~/.ssh echo "$DEPLOY_KEY" > ~/.ssh/id_ed25519 chmod 600 ~/.ssh/id_ed25519 ssh-keyscan -t ed25519, "$HOST" >> ~/.ssh/known_hosts eval "$(ssh-agent -s)" echo "$SSH_PASS" | ssh-add ~/.ssh/id_ed25519 rsync -avzr -e 'ssh -o StrictHostKeyChecking=no -v' --delete ./dist/ "${USER}"@"${HOST}":/var/www/html/"${DIR}"Sidenote
If you store some text as a secret and also a variable with identical content, the variable will also be redacted from the logs. I randomly set up a folder name as secret, but it was the same content as the domain. When I analysed my log output the values were redacted which was confusing at first.